
Setting up FIDO2 on Linux (1) - Tweaks, PAM Integration and Git Authentication

FIDO2
FIDO (Fast Identity Online) is a set of standards for passwordless authentication. FIDO2 is the latest version of the FIDO standard. It enables users to leverage common devices to easily authenticate to online services in both mobile and desktop environments.
Authentication with FIDO2 is based on public key cryptography. The user registers a device with the online service, and then authenticates by proving possession of the device. The device creates a new key pair for each service, and the private key is stored securely on the device, never leaving it.
In addition to classic two-factor authentication (2FA), FIDO2 also supports passwordless authentication. This means that users can authenticate without entering a password, using only a FIDO2 device.
SUDO
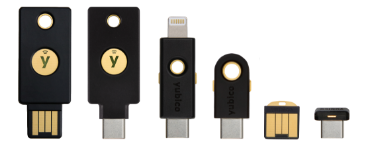
Various devices can be used for FIDO2 authentication, such as Nitrokey, YubiKey, or SoloKeys. These devices are connected to the computer via USB, NFC, or Bluetooth.
PAM
PAM is a central authentication framework used on Unix-like systems. It is used to authenticate users when they log in, and to manage the authentication process for various services.
PAM can be used to integrate FIDO2 authentication into the system.This allows developers to not rewrite authentication code for each application, and to use the same authentication method across all services by delegating authentication to PAM.
The integration of FIDO2 into PAM allows users to authenticate with FIDO2 devices for various services, such as SSH, sudo, or login seamlessly.
Pre-requisites
For this guide, we will use Fedora 40 as the operating system. The steps may vary slightly for other distributions (differences will be indicated where applicable).
In this guide, we have the Nitrokey 3A NFC as the FIDO2 device. The steps should be the same for the others.
First, we install the PAM module for FIDO which is luckily included in the most common distributions repositories.
1 | sudo dnf install pam-u2f pamu2fcfg fido2-tools -y |
The package pam-u2f contains the PAM module for FIDO2 authentication, pamu2fcfg is the helper tool for registering FIDO2 devices, and fido2-tools contains the tools for working with FIDO2 devices.
Debian/Manjaro/OpenSuse
1 | sudo apt install libpam-u2f pamu2fcfg fido2-tools -y |
FIDO2 Key Registration
A FIDO2 Key is ready for use right after purchase. No need to manually generate keys or configure anything. The key is ready to be used for authentication out of the box.
It only requires to be registered with the target system for authentication.
To support that, the user account is linked to the FIDO2 key data thanks to the helper tool pamu2fcfg.
Initially, we create a directory for the key data on the system:
1 | sudo mkdir /etc/fido2 |
Then, we register the FIDO2 key with the system, by linking the user account and FIDO2 key. Plug in the Nitrokey on a USB port and run the next command with the desired user account (i.e. not root).
Notice that the key will blink green to prompt you to briefly touch it (depending on the key if it is protected with a PIN, it must be entered in addition, we will also cover how to enable the PIN protection if the key didn’t come with it enabled).
1 | pamu2fcfg | sudo tee -a /etc/fido2/u2f_keys |
If at any time, you wish to be prompted for a PIN just edit the u2f_keys file and add ‘+pin’ just after ‘+presence’
PAM Configuration
The PAM configuration files for all distributions are located in the /etc/pam.d/ directory.
Each login service has its own configuration file. For example, the SSH service configuration file is /etc/pam.d/sshd.
The reference to the FIDO2 module must be inserted into the configuration file of the desired service. Mind that the order of the modules is important as the authentication process is sequential.
1 | auth sufficient pam_u2f.so authfile=/etc/fido2/u2f_keys cue [cue_prompt=Please briefly touch the Nitrokey...] |
The service type auth instructs PAM to use the module for authentication. The sufficient keyword tells PAM that if the module succeeds, the authentication process is complete. The authfile parameter specifies the path to the file containing the FIDO2 key data. The cue parameter is used to display a message to the user, in this case, when the FIDO2 key needs to be touched. The cue_prompt parameter specifies the message to be displayed.
It is important to know that changes to the PAM configuration files is active immediately upon saving the file.
However, thanks to the sequence of the modules, if the FIDO2 module is not connected to the computer, the user will still be able to authenticate with the password or fingerprint.
SUDO, Console and Desktop Logins
Fedora uses GDM – GNOME Display Manager – as the login manager which comes with the GNOME desktop environment. The configuration file for GDM is /etc/pam.d/gdm-password.
If you did some customisations to the display manager or desktop environment, you might want to figure out which service is responsible for the login.
1 | systemctl status display-manager |

The reference to the FIDO2 module must be inserted on top of the configuration file, before the other modules for the console login file etc/pam.d/login and the sudo file etc/pam.d/sudo.

You can test it by opening a TTY session with Ctrl+Alt+F3 and logging in with your user account. Return to the graphical session with Ctrl+Alt+F2.

You can test it by running a command with sudo.
Now, typically you will get 15 minutes of sudo access after the first successful authentication with the FIDO2 key. We can change that and make it prompt every time you run a command with sudo.
1 | sudo visudo |
Edit the line where it says Defaults env_reset to Defaults env_reset,timestamp_timeout=0 and save the file.
The PAM configuration file for the GDM display manager is /etc/pam.d/gdm-password. For which the reference to the FIDO2 module must be inserted second as indicated in the image below.

You can test it by logging out and logging in again to the system.
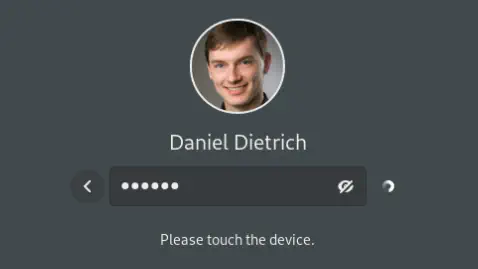
Credits: Smart Tux
Debian/Manjaro/OpenSuse
For Debian
1 | auth sufficient pam_u2f.so authfile=/etc/fido2/u2f_keys cue [cue_prompt=Please touch the Nitrokey...] |
is inserted above the existing line @include common-auth. for the following files:
- /etc/pam.d/sudo
- /etc/pam.d/login
- /etc/pam.d/lightdm (The default Debian Desktop Manager)
For Manjaro and OpenSuse
1 | auth sufficient pam_u2f.so authfile=/etc/fido2/u2f_keys cue [cue_prompt=Please touch the Nitrokey...]` |
is inserted above the existing lines for the following files:
- /etc/pam.d/sudo
- /etc/pam.d/login
- /etc/pam.d/lightdm (The default Manjaro Desktop Manager) and /etc/pam.d/gdm (The default OpenSuse Desktop Manager)
All distributions can also customise a central configuration file as an alternative to the individual PAM configuration files. This file is /etc/pam.d/system-auth. etc/pam.d/common-auth for Debian and OpenSuse.
You can include the line there as well for all services system-wide use of FIDO2.
For Fedora, the file is managed by the authselect tool, and any many manual changes might be overwritten.
Activate FIDO U2F support in PAM using authselect with the with-pam-u2f flag:
1 | sudo authselect select sssd with-pam-u2f |
If you also want to use your fingerprint reader you have to enable both features:
1 | sudo authselect select sssd with-pam-u2f with-fingerprint |
Tips and Tricks
PIN Management
To prevent misuse of the FIDO2 key, it is recommended to set a PIN. The PIN is required to unlock the key before it can be used for authentication.
We can rely on the fido2-tools package to manage the PIN or the Chromium browser.
Using fido2-tools
1 | fido2-token -L |
This command lists all FIDO2 keys connected to the system. The key is identified by the ID field.
1 | fido2-token -S /dev/hidraw1 |
This command sets a PIN for the FIDO2 key. Replace /dev/hidraw1 with the correct device path.
1 | fido2-token -C /dev/hidraw1 |
This command changes the PIN for the FIDO2 key. Replace /dev/hidraw1 with the correct device path.
1 | fido2-token -R /dev/hidraw1 |
This command resets the PIN for the FIDO2 key. Replace /dev/hidraw1 with the correct device path. The key will be reset to factory settings and all data will be lost. It is important to switch all accounts that have been linked to the key to an alternative authentication method before resetting the key.
Using Chromium
Chromium browser can also be used to manage the PIN of the FIDO2 key. The browser must be installed on the system.
Open the Chromium browser and navigate to chrome://settings/securityKeys and rhe rest is self-explanatory.

GIT Authentication over SSH and Nitrokey
Git over SSH can be configured to use the FIDO2 key to authenticate git operations exactly the same as when setting up SSH with the FIDO.
This can be implemented in two ways, either by using the FIDO2 key for all git operations or to use it just to sign the commits.
Using FIDO2 Key for All Git Operations
Let’s start first by generating a new SSH key for the FIDO2 key:
1 | ssh-keygen -t ecdsa-sk -f ~/.ssh/id_ecdsa_sk |
The -t ecdsa-sk specifies the type of key to generate, in this case, an ECDSA key with Secure Key (SK) support. The -f ~/.ssh/id_ecdsa_sk specifies the file to save the key to.
Now, we need to add the public key to GitHub user settings.
If you try to commit to a repository, git will wait for you to touch the FIDO2 key and will blink green to signal that.
Using FIDO2 Key to Sign Commits
To sign git tags or commits, we will need to configure git client to use SSH key format instead of PGP.
1 | git config gpg.format ssh |
In addition, we need to specify which key to use for signing:
Let’s generate a new SSH key (ECDSA with Secure Key support) for this purpose:
1 | ssh-keygen -t ecdsa-sk -f ~/.ssh/id_ecdsa_sk |
Then, we instruct git to use this key for signing:
1 | git config user.signingKey ~/.ssh/id_ecdsa_sk |
Next, we tell git which SSH public key is trusted for verification, in PGP case, it is the GPG key ring, for SSH it is the ~/.ssh/allowed_signers file.
We add it to the git configuration:
1 | git config gpg.ssh.allowedSignersFile ~/.ssh/allowed_signers |
All done, don’t foget to use the -S flag when committing to sign the commit upon which the Nitrokey will blink green to prompt you to touch it.
NFC Support
Per Nitrokey website, it is possible to use Nitrokey on Android smartphones. OpenKeychain, the popular Android app for OpenPGP encryption, supports Nitrokey. You can use your private keys on your Nitrokey to encrypt, decrypt and sign emails using OpenKeychain.
- Title: Setting up FIDO2 on Linux (1) - Tweaks, PAM Integration and Git Authentication
- Author: ADM-MIDA0UI
- Created at: 2024-05-17 20:00:00
- Updated at: 2024-05-26 21:56:44
- Link: https://admida0ui.de/2024/05/17/fido/
- License: This work is licensed under CC BY-NC-SA 4.0.